The map markup feature allows you to draw points, lines, polygons, circles and labels directly on the map for custom notes and illustrations. There is a change in the way a circle or rectangle is drawn. After adding all your custom shapes and labels to the map, you can save your markup so it can be retrieved at a later time.
|
1.
|
If the Map Tools pane is not expanded, in the map viewer, click the Map Tools button.
|
|
2.
|
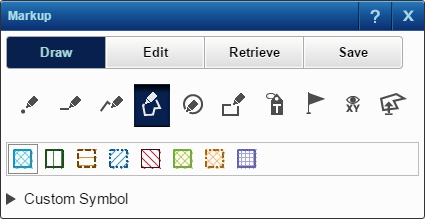
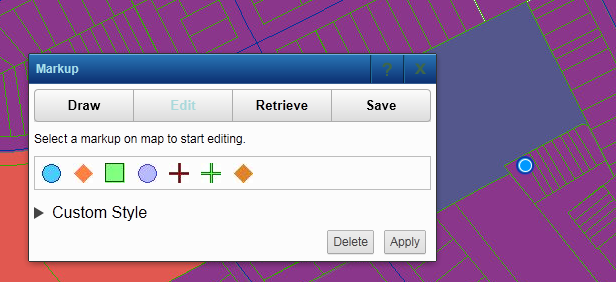
The Markup window opens containing all markup tools, symbols, and label styles that you can use to create markup shapes. If multiple symbols or label styles are available, select the type that you want to use on the map.
|
|
||||||||
|
|
||||||||
|
|
Allows you to click points on the map to draw multiple connecting lines
|
|||||||
|
|
Add Polygon
|
Allows you to click several points on the map to create a polygon (double-click to complete the shape)
|
||||||
|
|
||||||||
|
|
Add Rectangle
|
|||||||
|
|
Adds the label you define to the area on the map that you select
|
|||||||
|
|
Add My Point
|
Allows you enter a custom label and display that label as a point on the map
|
||||||
|
|
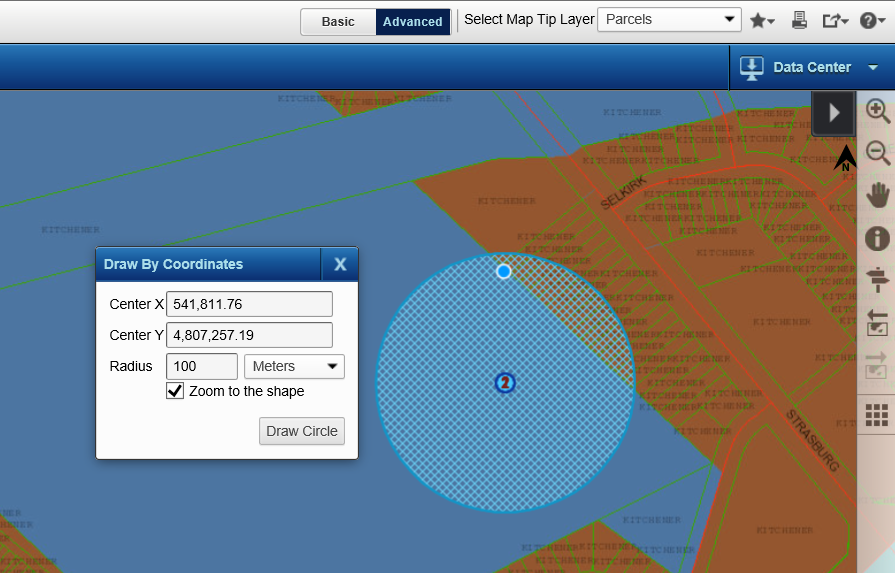
Draw By Coordinates
|
Have a circle drawn for you and have it positioned and sized according to your specifications.
|
||||||
|
|
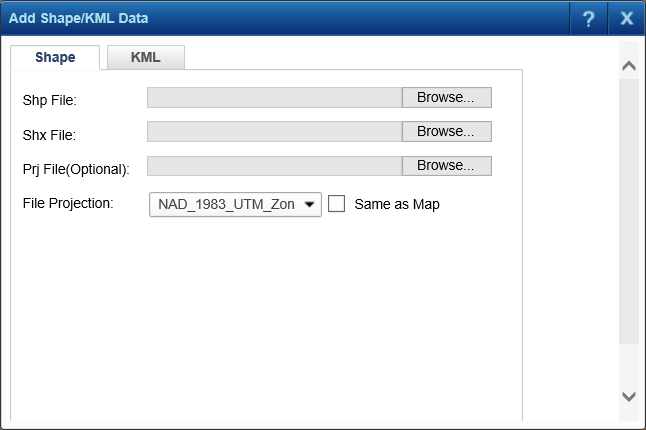
Add Markups From Shape/KML
|
Adds markups from the uploaded shape or KML files.
|
 |
|
3.
|
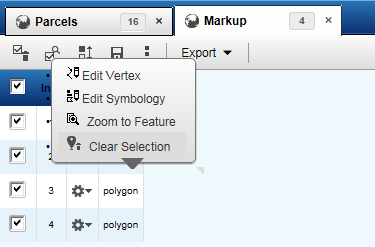
Draw the shape on the map. After you finish drawing, the Results window is displayed. Click the Other Options menu as shown in Figure 268 below to view more options. After adding the shape or label to the map, you can change either the shape size using the Edit Vertex icon
|
 |
|
To remove the markup items from the map, click the Close icon
|
|
1.
|
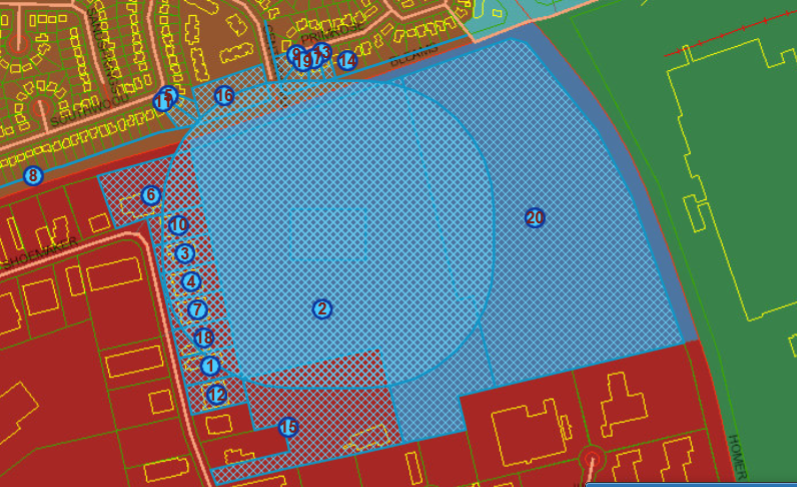
Using the Map Markup tools draw a shape at a position on the map near where you want to select other map features. See Marking up the map for more information on creating map markup shapes.
|
|
2.
|
|
3.
|
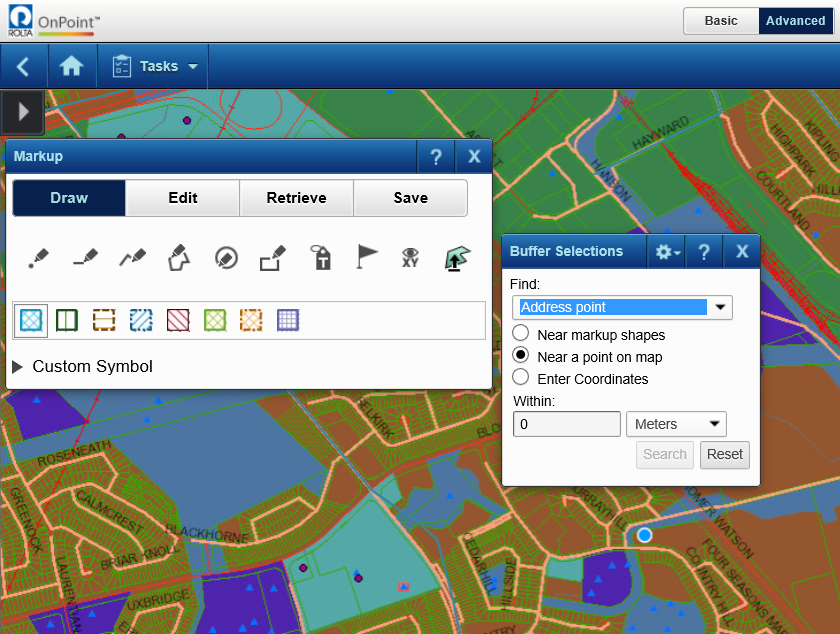
On the Buffer Selections dialog box, from Find, select the type of map features you want to select by creating a buffer zone around the map markup shape.
|
 |
|
4.
|
Select the Near Markup Shapes option if it is not already selected.
|
|
5.
|
In the Within field, specify the distance around the map markup shape within which you want to select map features.
|
|
6.
|
Click Option
|
|
7.
|
 |
|
a.
|
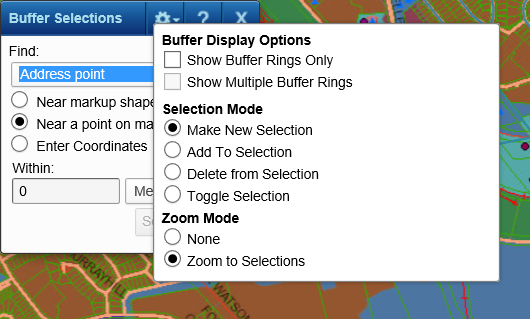
In the Buffer Display Options section, neither option is available. A single buffer ring is drawn around the map markup shape as shown below.
|
 |
|
b.
|
In the Selection Mode section, select the option that defines how items are added or removed from the selection when you select features on the map. The options are the following:
|
|
•
|
Make New Selection. This option creates a new selection.
|
|
•
|
Add To Selection. This option adds a selection to an existing list.
|
|
•
|
Delete From Selection. This option removes selected items from an existing list.
|
|
c.
|
In the Zoom Mode section, select either Zoom To Selections to have the map zoom in or out to show the buffer area or None to have the map remain at the current map scale.
|
|
8.
|
Click Search.
|
Results display both on the map and in the Results window.
|
•
|
If the feature group selected in the Buffer Selections tool is different from the original selections, the original selection displays underneath the new active selection. To reactivate the original selection, select its tab.
|
|
•
|
If the feature group selected in the Buffer Selections tool is the same as the original selections, the new buffer selections are displayed under the original selections in the same list.
|
|
•
|
All selections in the Results window that were added as a result of using a buffer are shown with an asterisk (*).
|
 |
|
•
|
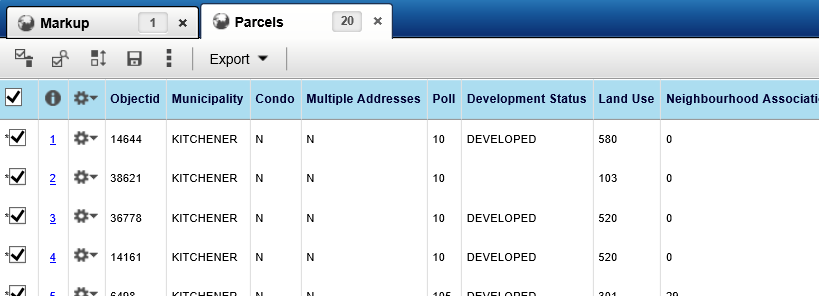
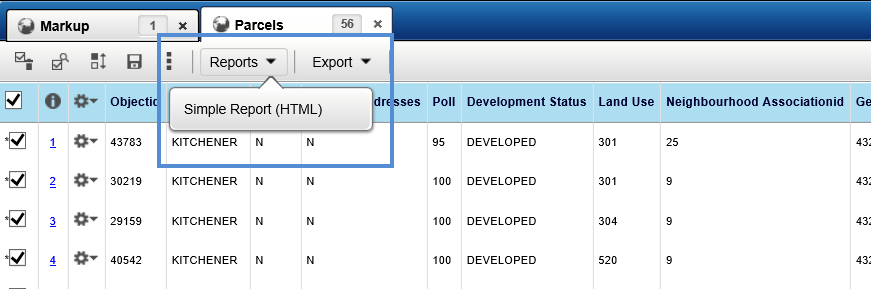
If reports for buffer selections have been configured by your map administrator, reports containing the data you selected with the buffer tool can be accessed from the top left corner of the Results window.
|
 |
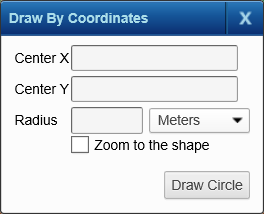
Draw a circle and have its center positioned at a point of your choice on the map by supplying an X, Y coordinate pair, and have its radius measure the length you specify.
|
1.
|
If the Map Tools pane is not expanded, in the map viewer, click the Map Tools button.
|
|
2.
|
|
3.
|
 |
|
4.
|
In Center X, specify the X coordinate of the circle’s center point.
|
|
If you do not have coordinates for the center of the circle, you can use the Measure tool to obtain them.
In the Tools menu, select the Measure tool, the Point tool , and then click a position on the map to obtain its X, Y coordinates.
Make sure the coordinate system specified in the Measure tool is the same as that specified in the Draw by Coordinates tool.
|
|
5.
|
In Center Y, specify the Y coordinate of the circle’s center point.
|
|
6.
|
In Radius, specify the length of the radius of the circle and then select a unit of measure from the drop-down list to the right.
|
 |
|
1.
|
If the Map Tools pane is not expanded, in the map viewer, click the Map Tools button.
|
|
2.
|
On the Map Tools pane, click the More Tools button and then select Markup. The Markup dialog box appears.
|
|
3.
|
 |
|
a.
|
Click the Shape tab
|
|
c.
|
Select a file projection from the File Projection drop down or select the Same as Map check box to select the same projection as the map.
|
 |
|
d.
|
Click Upload.
|
|
a.
|
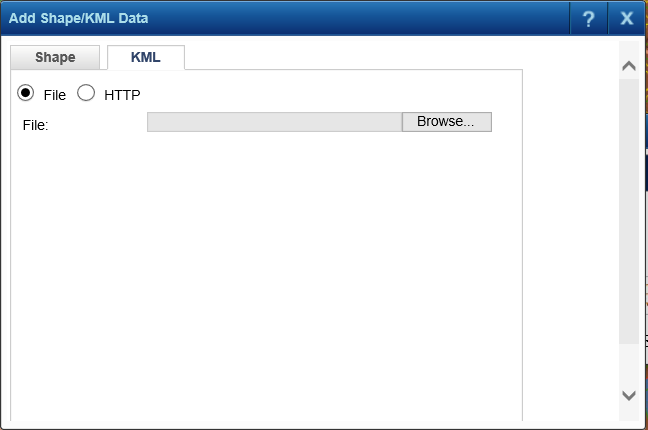
Click the KML tab.
|
 |
|
c.
|
If you select the File option, browse and select the required KML file.
|
|
d.
|
If you selected the HTTP option, specify the URL of the KML file.
|
|
e.
|
Click Upload.
|
|
1.
|
In the Results window, click the Other Options icon next to the data entry for the markup shape you just created. See Figure 279 below.
|
|
|
|
2.
|
Click the Edit Vertex icon
|
|
Alternatively, to select a shape for editing, you can open the Edit tab in the Markup dialog box and click the markup shape on the map.
|
|
3.
|
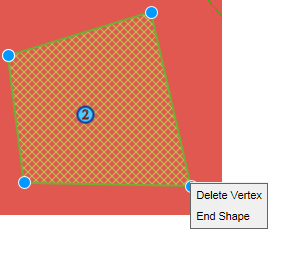
On the map, drag one of the blue circles on the outline of the shape and move it to the desired location to change the shape.
|
|
•
|
To delete a vertex, move the mouse to point at the blue circle for that vertex point and either click Delete on the keyboard or right-click and click Delete.
|
 |
|
5.
|
To delete a vertex, right click at the vertex and select Delete Vertex.
|
|
6.
|
 |
|
1.
|
In the Results window, click the Other Options menu as shown in Figure 282 below to view more options.
|
|
|
|
•
|
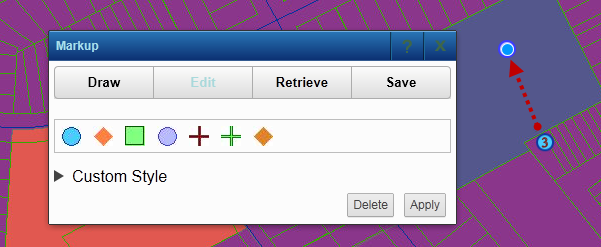
The Markup dialog box appears and the Edit tab is active. In addition, the point is selected on the map. See Figure 283 below.
|
|
Alternatively, to select a point, you can open the Edit tab in the Markup dialog box and click the point on the map.
|
 |
 |
|
5.
|
In the Markup dialog box, click the Apply button.
|
|
1.
|
In the Results window, click the Other Options menu as shown in Figure 285 below to view more options.
|
|
|
|
•
|
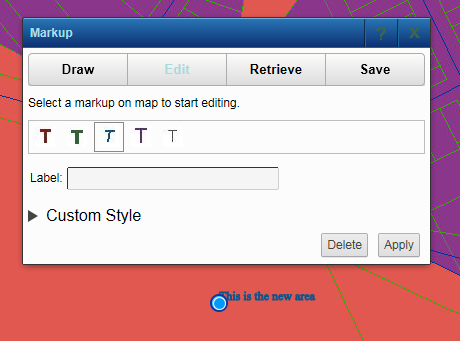
The Markup dialog box appears and the Edit tab is active. In addition, the label is selected on the map. See Figure 286 below.
|
 |
|
Alternatively, to select a label, you can open the Edit tab in the Markup dialog box and click the label on the map.
|
|
5.
|
In the Markup dialog box, Click the Apply button.
|
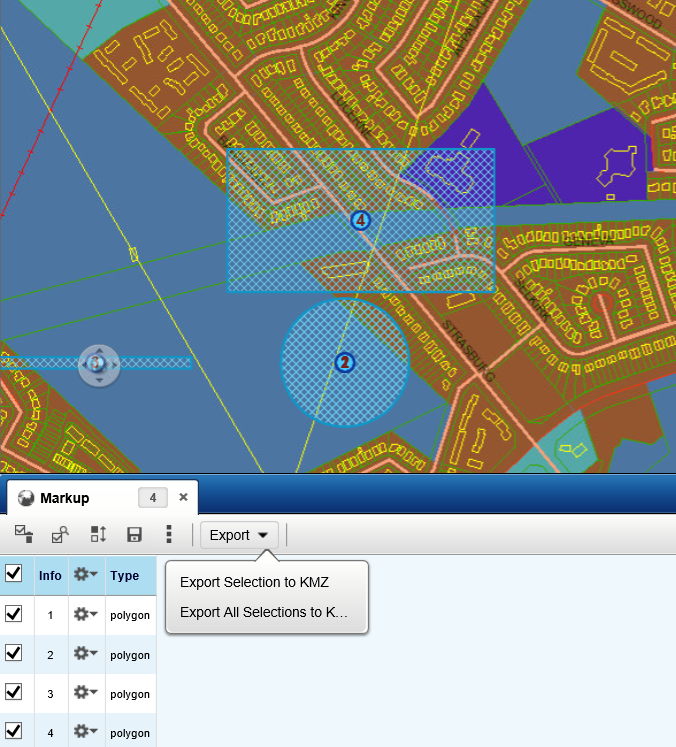
After creating a map markup objects using one of the Markup tools, you can export them using the Export Selection to KMZ option, which you can then view in Google Earth.
|
Only the geometries of the map markup objects are exported. No attribute data is exported.
|
|
2.
|
Scroll to the Export Selection to KMZ option. By default all markup objects you have created have their check box on the Results window selected.
|
|
3.
|
Click the Export Selection to KMZ option. Depending on the browser you are using, you are prompted to download the resulting .kml file.
|
 |
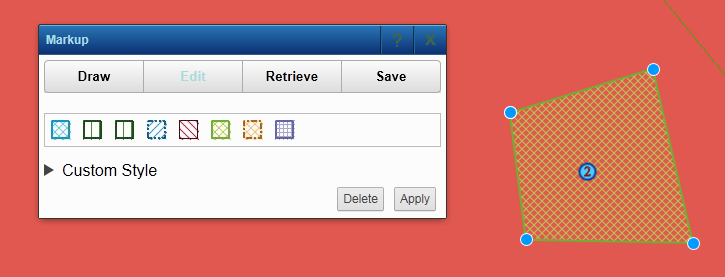
After drawing shapes on the map, you can change the symbols associated with the shapes you have drawn.
|
1.
|
In the Results window, click the Other Options menu as shown in Figure 288 below to view more options.
|
|
|
|
2.
|
Click the Edit Symbology icon
|
|
Alternatively, to select a shape to edit the symbology, you can open the Edit tab in the Markup dialog box and click the shape on the map
|
|
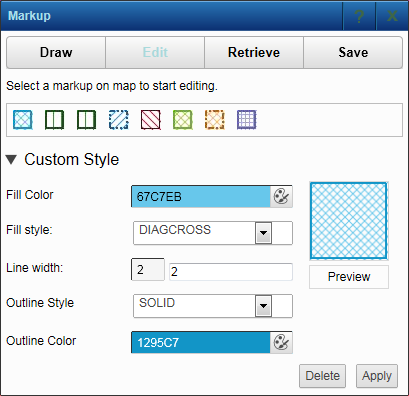
3.
|
Select a different symbol if available. If you want to change the symbol’s properties, click the Custom Style option. This displays all configurable settings for the symbol.
|
 |
|
4.
|
Change the symbol type, fill options or outline options. Click Preview to view the symbol preview.
|
|
5.
|
Click Apply to save the changes.
|
After the markup symbols have been drawn, they can be saved as private or public. Public markup is available to all users who request publicly-saved markup selection sets, and private markup requires that you have a user account before you can access to them.
|
1.
|
In the Results window, click Save Selections
|
|
Alternatively, you can save the markup shapes by clicking the Save tab in the Markup dialog box.
|
|
2.
|
In the Selection Name field, type the name of the markup map. You can optionally enter a description in the Description field.
|
|
3.
|
Select either the Save All option to save all markup items or the Save Selected option to save only those items with the check boxes selected.
|
|
4.
|
In the Accessibility Options field, select either Public or Private.
|
|
•
|
The Public option allows all individuals to view this markup map while the Private option allows only you to view it.
|
|
•
|
In the UserId field, enter your user name. This field displays if you have not logged with your user account before creating the markup map.
|
|
5.
|
(Optional) In the Email To field, type the email address of the individual you want to email this map link to. This option requires that the email server is set up by the map administrator. The individual will require the user ID to access the map.
|
|
6.
|
In Email From, specify the email address where you want the recipient of the map link (indicated in Email To) to be able to send a return email.
|
|
•
|
Depending on how your map administrator has set up security and users for the OnPoint web-GIS application, your email address may automatically appear in the Email From field.
|
|
7.
|
Click Save.
|
|
1.
|
|
2.
|
On the Map Tools pane, click the More Tools button and then select Markup. The Markup dialog box opens.
|
|
3.
|
|
4.
|
In Accessibility Options, select from the options All, Private, or Public. If you select All or Private, you will be asked to enter a user ID. All public markup, as well as private markup matching the user ID will be retrieved.
|
|
5.
|
You may enter criteria to filter the list of retrieved markup. Enter the Selection Set Name if known, or the date range that may include the required markup set.
|
|
6.
|
Click OK to get a list of saved markup sets.
|
|
7.
|
Select the check box for the required markup and click Display Selections to see the saved markup set on the map.
|