Notifications are information notices that can be sent to properties surrounding an area of interest to alert owners or occupants of any changes or new developments. Examples of when to send notifications would be to notify all houses on a street when a new sidewalk is being constructed or that cable lines are being replaced and a temporary disruption in cable will occur.
When creating a notification report, two feature types have to be selected on the map. The first features are the subject features being created or modified, such as new sidewalks. The second features are the notification features that will receive the notices about property changes in the vicinity, such as owners of buildings or land parcels.
|
1.
|
|
2.
|
On the Map Tools pane, click the More Tools button and then select Notification. The Notification window opens.
|
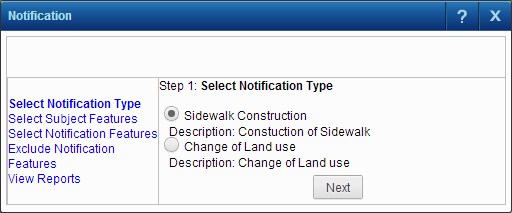
All available notification types are displayed with a brief description of each type. If only one notification type is available, it is selected automatically and this step is skipped.
 |
The Select Subject Features window opens. The subject features are the features on the map that are being created or modified.
|
•
|
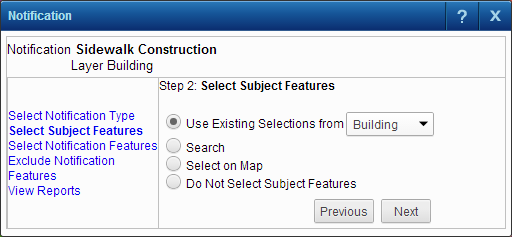 |
If you have selected features previously on the map and those features have been configured for notifications, you can use them as subject features. This option is unavailable if there are no selections on the map.
Clicking Next moves you to Step 3 and all selections except for the selected layer and the notification layer are cleared from the map and selections list.
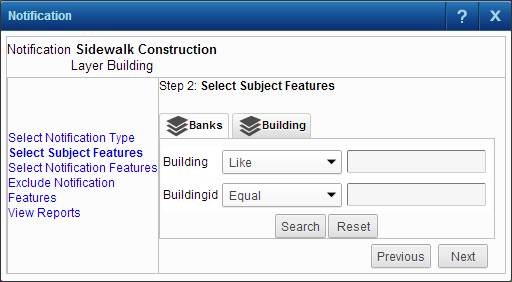
This option displays a search. If multiple searches have been configured for this notification type, the available searches are displayed as links.
|
b.
|
Click the Search button to start the search.
|
 |
This option allows you to manually select the subject features on the map. The Selection toolbar containing point, line and polygon tools is displayed with the point tool selected by default. The clear selections tool is displayed after selecting features on the map so you can clear any selections made by mistake.
 |
Use this option if you have selected notification features before opening the Notification window. If no notification features have been selected previously and you click the Next button, an error message is displayed.
|
5.
|
After entering the criteria for Step 2, click Next to move to Step 3.
|
 |
|
6.
|
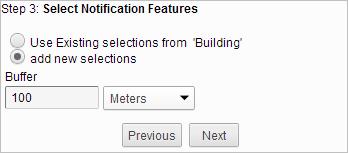
Select the features that will receive the notification by selecting either previously selected features or by selecting new features. If you have used the Use Existing Selections option, the Add new selections option is not available.
|
If you select the Create new selections option, you can specify an extended area (buffer) that selects all notification features within a set distance from the selected subject features.
 |
|
7.
|
Click Next. The Exclude Notification Features window opens.
|
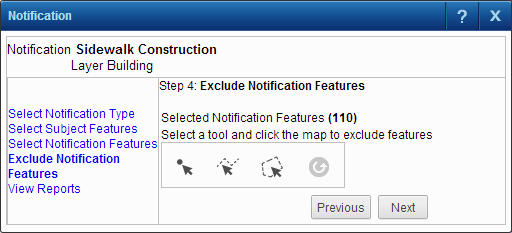
Since you may not want to include all features selected for the notification, Step 4 allows you to exclude features from the map using point, line or polygon tools.
 |
|
8.
|
With one of the tools, select the features to exclude on the map. The map is refreshed and the selected features are removed.
|
|
9.
|
Click Next.
|
 |
|
10.
|
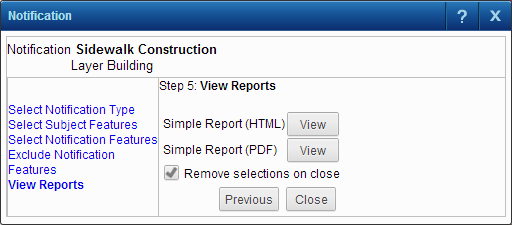
Click the View button for a report type to view the report information for the selected features. If the report is a Crystal Report, you have additional options to view the report in the Crystal Report viewer or in a .pdf format.
|
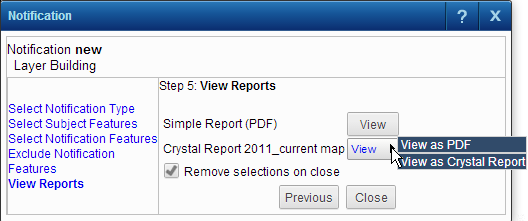 |
You can select the Remove selections on close option to remove all selections on the map, including those created before opening the notification window, when you click the Close button.
|
11.
|
Click Close to close the Notification window.
|
|
Clicking Close does not automatically generate a notification report—you need to click the View button to generate the report.
|