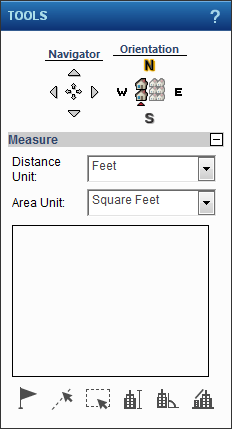
Pictometry Online tools display in a TOOLS dialog box in the center of the map viewer by default if you have access to a Pictometry Online image map. Expand the Measure section to view all the tools available. See the related topics after the table below for instructions on performing tasks with these tools.
 |
|
 |
Click on the cardinal direction to view the currently displayed image map from that direction. For example if you want to view the currently displayed image from the north, click the N.
|
|
|
Use the Location tool to select a point to obtain its latitude and longitude.
|
|
|
Use the Distance tool to trace a line on the image to have the distance of the line measured. The length of the line is displayed on the TOOLS dialog box.
|
|
|
Use the Area tool to trace a shape on the currently displayed oblique image to have the area of the shape measured. Select a starting point and hold down the mouse button to draw the first line of the object. Press and hold the Ctrl key. Drag the mouse along another edge of the object. Release the mouse button and the Ctrl key. The tool draws a shape whose area is measured and displayed on the TOOLS dialog box.
|
|
|
Use the Height tool to measure the height of an object on the currently displayed oblique image. Select a starting point at the base of an object, hold down the mouse button and drag to the ending point.
|
|
|
Use the Bearing tool to measure the degree of an angle of an object in relation to true North.
|
|
|
Use the Elevation tool to measure the height above sea level of a point you select on the currently displayed image.
|
 |
|
3.
|
|
2.
|
Click a starting point and hold down the Alt key while dragging the mouse.
|
|
3.
|
|
2.
|
Click a starting point on the map, hold down the mouse button, and drag until you have reached the end of the segment you want to draw.
|
|
3.
|
Press and release the Shift key.
|
|
5.
|
|
2.
|
|
3.
|
Press and release the v key.
|
|
7.
|
|
3.
|
Press the Ctrl key and drag the mouse along the adjoining edge of the object. The tool creates a boxed line around the perimeter of the object.
|
|
4.
|
|
2.
|
Click a starting point and hold down the Alt key while drawing a line around the object. For best results, ensure the start point and stop point are joined.
|
|
3.
|
|
1.
|
|
2.
|
|
3.
|
Press and hold the Ctrl key. Then drag the mouse along an adjoining edge of the object. The tool creates a boxed line around the object.
|
|
4.
|
Release the mouse button and Ctrl key. The area is displayed in the Measure section of the TOOLS dialog box.
|
|
2.
|
Press and hold the Alt key.
|
|
3.
|
Select a starting point, hold down the mouse button and draw a free form line. For the best results, ensure that the start point and stop point are joined. Any gap between the start and end point is automatically closed.
|
|
4.
|
Release the mouse button and Alt key. The area is displayed in the Measure section of the TOOLS dialog box.
|
|
2.
|
|
3.
|
Press and release the v key. This drop a vertex at this point.
|
|
5.
|
|
2.
|
Select a starting point at the base of an object (such as the base of a building), hold down the mouse button, and drag to the ending point.
|
|
3.
|
|
You must measure upwards starting at the base of an object to obtain an accurate height.
|
|
2.
|
Click the desired location on the image. The latitude and longitude are displayed in the Measure section of the TOOLS dialog box.
|
The Bearing tool enables you to measure the degree of an angle in relation to true North. You can also measure the angle of an area in an image by designating three separate points from which to measure.
|
1.
|
|
3.
|
Release the mouse button. The degree of the angle is displayed in the Measure section of the TOOLS dialog box.
|
|
2.
|
Click a starting point on the image and draw a line. Press and hold the Ctrl key, then drag the pointer in a different direction.
|
|
3.
|
The line splits in two at the start point and enables you to draw a second line to represent a fork in the road or the angle of an object.
|
|
4.
|
Release the mouse button and Ctrl key. The degree of the angle is displayed in the Measure section of the TOOLS dialog box.
|